Setup a connected hardware wallet
Prerequistes
This guide explains how to setup a USB connected hardware wallet with Sparrow to create a secure Bitcoin storage solution. If you haven’t read the Quick Start guide yet, that’s a good place to learn how to install and get introduced to Sparrow.
We will be using a Trezor in this guide, but the process is very similar for all USB connected hardware wallets - Sparrow supports the Trezor, Ledger, Coldcard, BitBox02, Blockstream Jade, KeepKey and OneKey. Sparrow communicates with all of these devices in the same standard way, so whichever device you have, you should be able to follow along. The Coldcard can also communicate over USB if configured, but if you are using this device, you MUST check and upgrade your firmware first.
Why use a hardware wallet?
If you’ve followed the Quick Start guide, you will already have Sparrow running with a software wallet. This is a good place to start getting familiar with sending and receiving Bitcoin transactions, and is a reasonable option to store small amounts. If your balance starts to grow however (to the point where you would care about losing it), then it’s time to consider purchasing a hardware wallet.
Hardware wallets offer something that software wallets cannot - they are simple devices that store your private keys and sign transactions, but otherwise have very limited connectivity and functionality. This is a good thing, because it means they are very difficult to hack! In a connected world of viruses and other malware, hardware wallets represent a major improvement in securing your Bitcoin.
Connected or airgapped?
There are two ways to use a hardware wallet with Sparrow. A connected hardware wallet is plugged into your computer with a USB cable, and Sparrow communicates with it directly. An airgapped hardware wallet is never connected to your computer - instead, files are moved back and forth on an SD card, or QR codes are scanned. The Setup an airgapped hardware wallet with QR codes and Setup an airgapped hardware wallet with SD cards guides cover those approaches if you prefer them.
A connected setup is simpler and more convenient - there are no SD cards to shuffle back and forth, and you can verify addresses on the device screen with a single click. Note that even when connected, your private keys never leave the hardware wallet. The device only receives transactions to sign, and only returns signatures - all signing happens inside the device itself.
Why Trezor?
There are many hardware wallets available to purchase. The Trezor is a good choice because it:
- Runs fully open source firmware that anyone can inspect
- Has a screen on the device, so you can verify addresses and transactions independently of your computer
- Has a long track record, being the first hardware wallet ever produced
It is worth noting however that other choices are also reasonable, and in fact it is preferable when setting up a multisig wallet to use multiple vendors. As mentioned above, this guide applies generally to all USB connected hardware wallets.
Ordering and receiving
The Trezor should be ordered from the Trezor shop only, and not third party resellers. The same advice applies to any hardware wallet vendor - buying direct removes the chance of receiving a device that has been tampered with along the way. Ideally, have it shipped to an address that is not your home - but don’t let this be a reason for not buying one!
Once you have received your Trezor, examine the packaging for tampering before opening it. Check that the tamper-evident seals are intact and undamaged - your vendor’s site will describe what to look for on your particular model. If you’re confident the package has not been tampered with, you can open it and proceed to setting up the device.
Setting up your Trezor
Before Sparrow can use your Trezor, the device needs to be initialized - that is, install its firmware, create a new wallet seed, and set a PIN.
This initial setup is done with the vendor’s own software, in this case Trezor Suite.
Follow the instructions there to install the firmware and select Create new wallet.
Other vendors have similar setup applications - follow the instructions for your device.
A Trezor ships without firmware installed, and installs it on first use. If your Trezor arrives with firmware already installed, or asks for a PIN out of the box, don’t use it - contact Trezor support. Note that this is specific to Trezor - other vendors ship their devices with firmware pre-installed and check authenticity in other ways, so follow the setup guidance for your particular device.
During setup, the device will generate a unique, long random number, which is the seed for your wallet. It will then encode that random number into a set of words (12 or 24 depending on your model and backup type), which will be displayed on the device screen. The device will ask you to write down these words. You should do this carefully on paper only (or even better, on a metal plate).
These words are the key to your wallet - anyone who has them can steal your Bitcoin! Unless you know what you’re doing, you should NEVER enter these words anywhere but another hardware wallet. In particular, never type them into your computer - a legitimate application will never ask you to. Store the words in the most secure place you can think of, and consider making another copy for a second location in case of fire etc.
Finally, set a PIN on the device. Similar to a phone passcode, this PIN is an important defense against others using the device to sign transactions and steal your Bitcoin. Choose a PIN that others cannot easily guess, and that you can remember.
Once setup is complete, close Trezor Suite (or your vendor’s application) before continuing. Only one application can talk to the device at a time, so leaving the vendor software running can prevent Sparrow from finding your device.
Congratulations! Your Trezor is now ready.
Importing your Trezor into Sparrow
Although your Trezor is great at keeping your seed secure, it can’t create a transaction or display your balance. For that, you need Sparrow. Importing your Trezor into Sparrow means importing the public key details into Sparrow so it can display your balance and addresses, and send and receive transactions to your wallet.
The difference between public and private keys is beyond the scope of this guide, but know that someone who has your public key can see your wallet transactions, but can’t steal your funds. The Trezor will never export your private key.
Make sure your Trezor is connected to your computer with its USB cable and unlocked.
(If you are running Linux, you may need to configure udev rules before your device can be detected - see Tools > Install Udev Rules from the Sparrow main menu.)
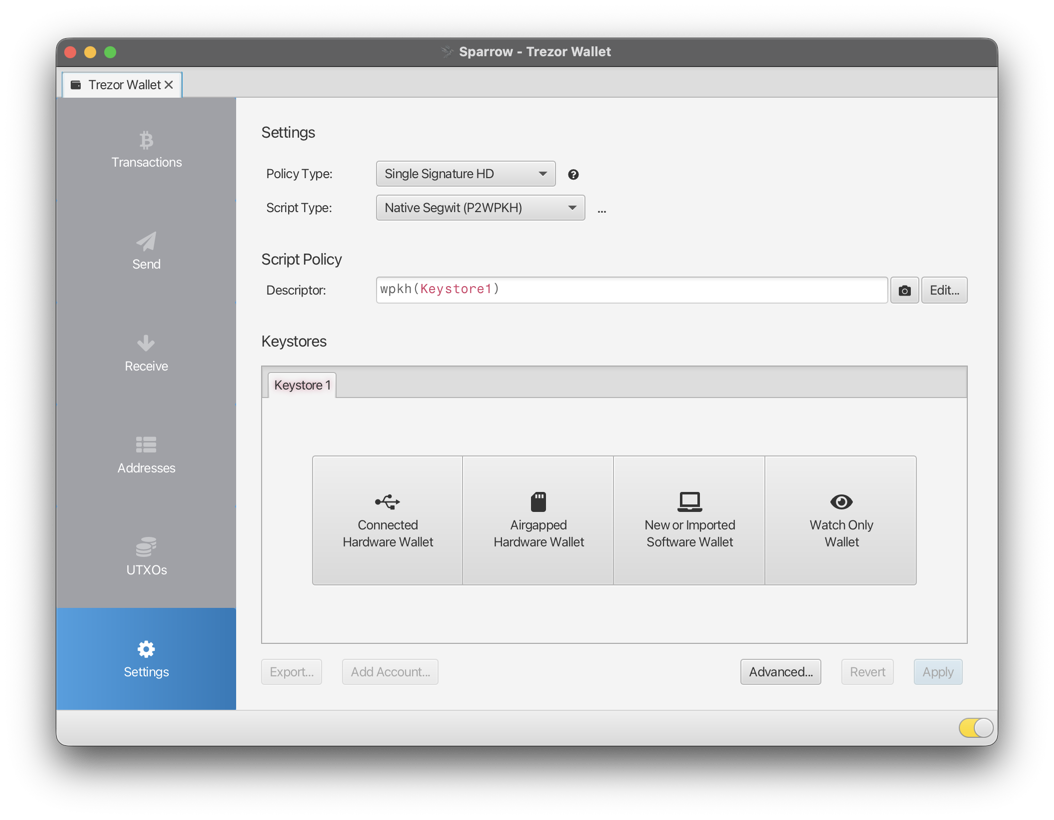
In Sparrow, from the menu select File > New Wallet and choose a name for your wallet. You will now see the Sparrow wallet Settings screen. You can leave all of the fields on the defaults and select ‘Connected Hardware Wallet’ from the four buttons below.
Sparrow will open the Connected Hardware Wallet screen. Click ‘Scan…’ and Sparrow will search the USB ports for hardware wallets. Your device should appear - if it doesn’t, check it is unlocked and that the vendor software is closed. If it still doesn’t appear, try a different USB cable or port. Depending on your device, you may be asked to enter your PIN and approve the connection on the device itself.
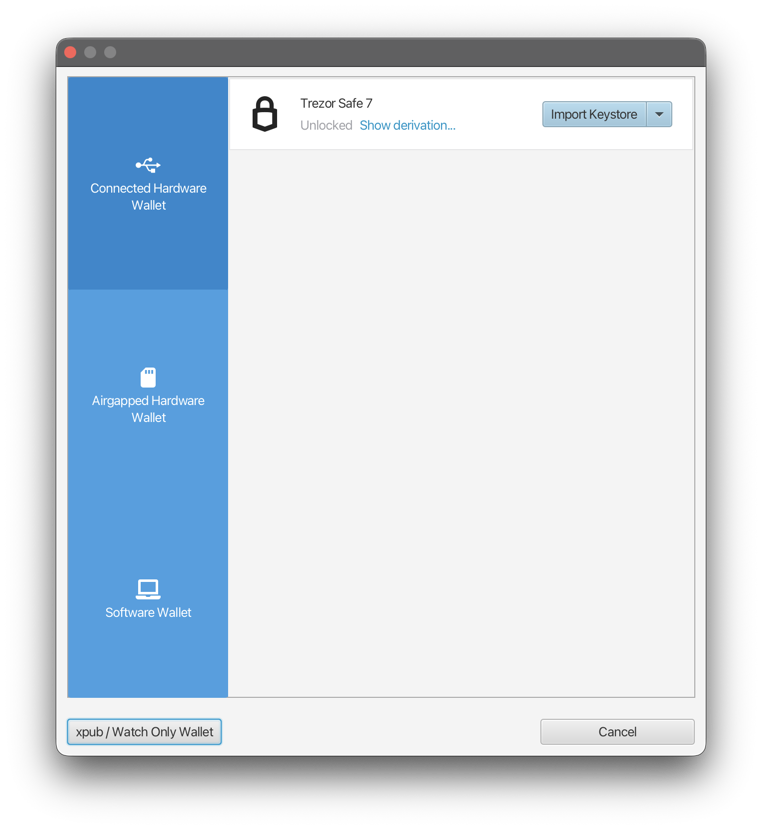
Some devices will also ask if you want to use a passphrase. On the Trezor this feature can be toggled on and off. A passphrase is an advanced feature that creates a different wallet for every passphrase entered - powerful, but a common source of lost funds for newcomers. For this guide, we will not use a passphrase.
Click ‘Import Keystore’. Sparrow will retrieve the public key details from the device for the default derivation path and display them on the Settings screen:
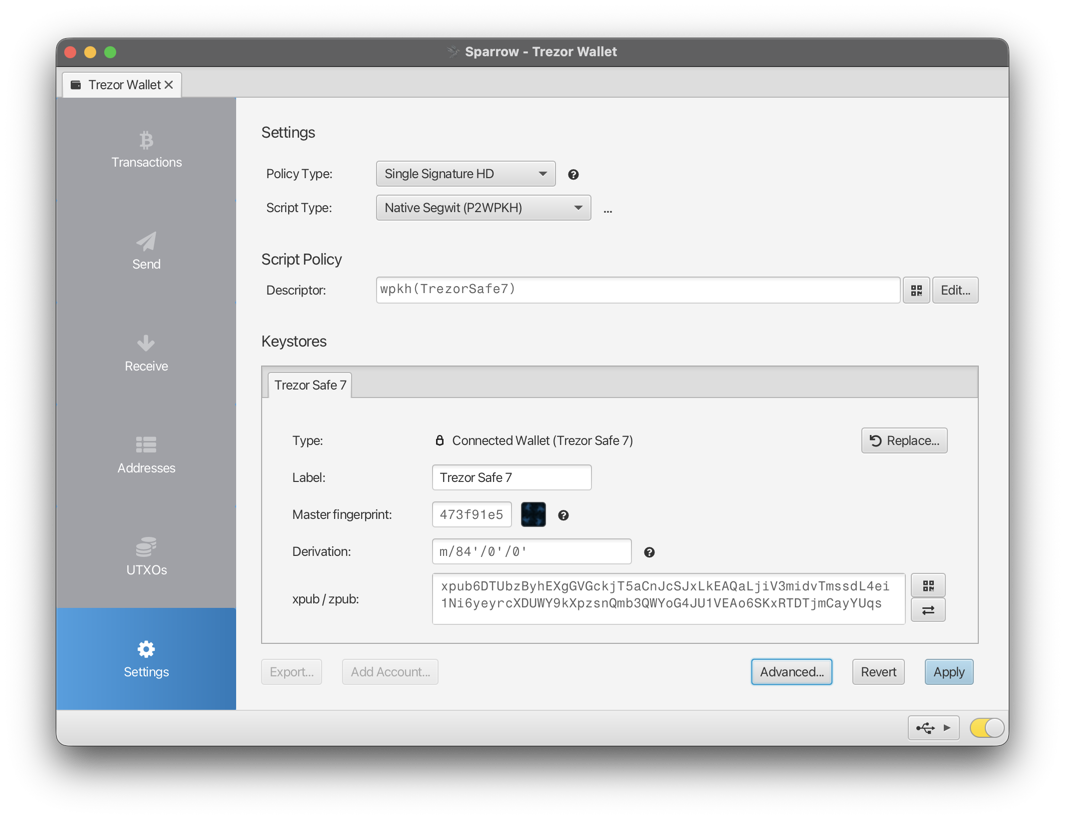
You can now click ‘Apply’ at the bottom. You should choose a good password to protect the wallet file - even though the Trezor is protecting your funds from being stolen, a password on the Sparrow wallet protects your privacy. If Sparrow is connected it will look for any transactions, but since this is a new wallet there won’t be any.
Congratulations! Setup is complete and your wallet is ready to receive bitcoin.
Receiving Bitcoin
In Sparrow, using the blue menu on the left select ‘Receive’. The address field will display the first receive address in your wallet:
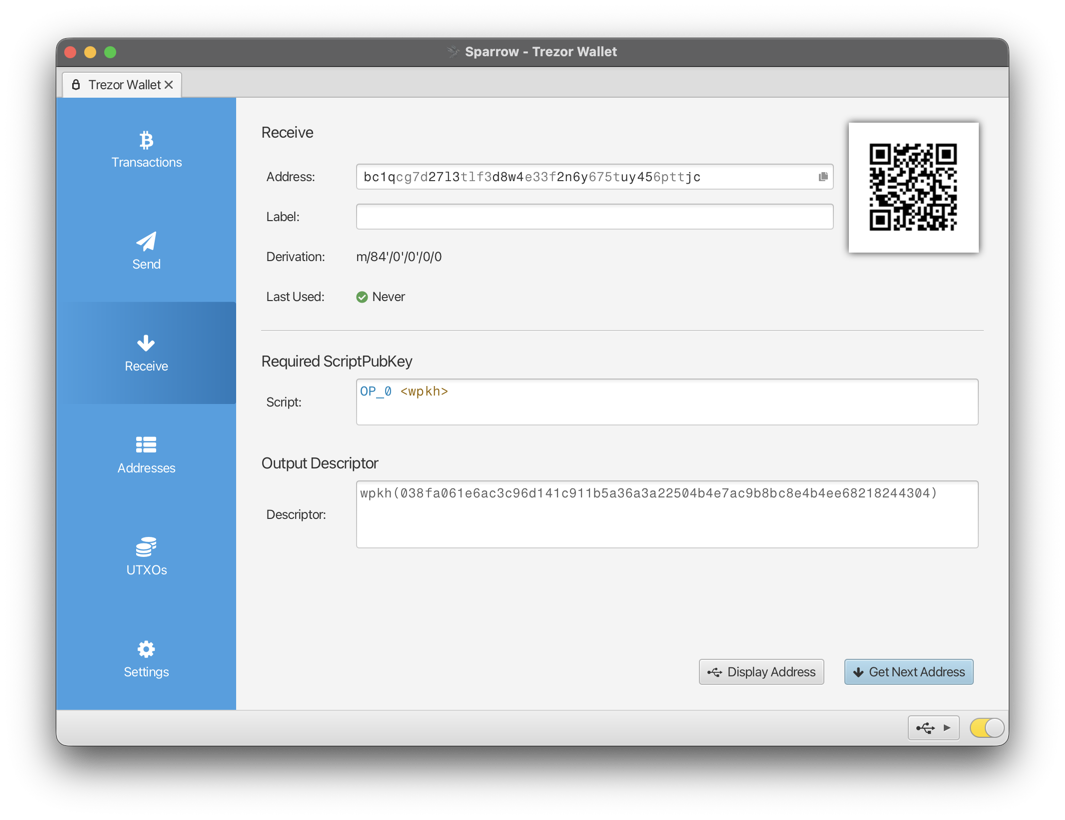
This is where a connected hardware wallet shines - you can verify the address on the device itself. Click the ‘Display Address’ button, and the same address will be shown on the Trezor screen. Check that it matches the address Sparrow is displaying. This confirms the address really belongs to your hardware wallet, and protects you against malware that could alter the address shown on your computer screen.
You can now receive to this address, for example from an exchange. Once the exchange has sent the funds, you will see a new transaction in the Transactions screen (top button on blue menu) in Sparrow. Generally you should wait for at least one confirmation of this transaction (about 10-30 minutes) before you can send bitcoin from this wallet. However, if you are sending to yourself, you can send a transaction immediately.
Sending Bitcoin
Once your wallet has funds, you can send from it. To do this, go to the Send screen and enter the destination address, the label and the amount. Note that you can use an address from this wallet (send to yourself) using the drop-down arrow on the right in the address field. You can then click ‘Create Transaction’. This will open up the transaction editor with your new transaction, where you can inspect the inputs and outputs. For now though, we are going to practice signing with the Trezor.
Click the large blue ‘Finalize Transaction for Signing’ button. You will now see the Signatures area, which shows the progress of signing the transaction. Because we are using a connected hardware wallet, simply click the ‘Sign’ button with the USB icon. Sparrow will open a dialog and send the transaction to the Trezor:
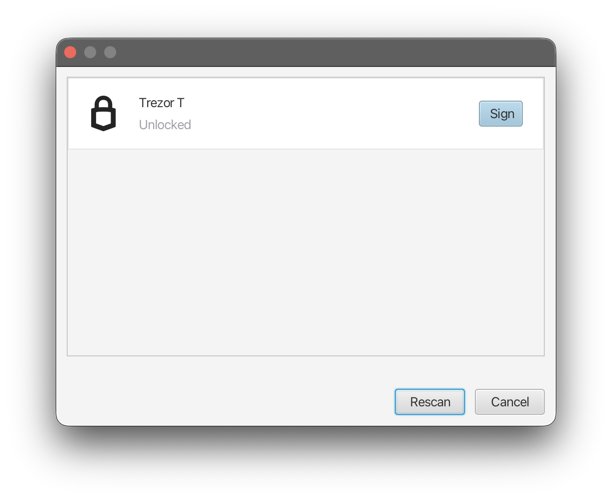
The device will now present the details of the transaction to you on its screen.
It’s important to verify these details are correct on the device screen, not just in Sparrow. Check that the address and amount matches. You can select from the Outputs tree on the left in the Sparrow transaction editor to view these details. This check is the whole reason your hardware wallet has a screen - even if your computer were compromised, the device shows you what you are really signing.
Once you’re satisfied, confirm the transaction on the device. The Trezor will sign the transaction and return the signature to Sparrow. The signatures progress bar will fill to indicate the transaction is now signed! To send the transaction, click ‘Broadcast Transaction’. Your transaction will be broadcast to the Bitcoin network, and hopefully be confirmed into the blockchain shortly.
Congratulations! You now have a secure Bitcoin storage solution, and can send and receive from it. Keep your device firmware up to date to take advantage of all its features, and keep your seed words in a safe place - they will make sure you don’t need to worry about loss of funds!
Bonus: Adding an account
You can now add an account to your wallet, which is in effect creating a second Bitcoin wallet based on the same seed but a different derivation path. A second account allows you to segregate funds (for example KYC and non-KYC funds) which ensures that differently sourced UTXOs are not linked when spending. You can also use accounts to segregate funds intended for different purposes.
To add an Account, go to the Settings tab in Sparrow and click Add Account… at the bottom. You will be able to select from multiple different accounts - for now, select Account #1.
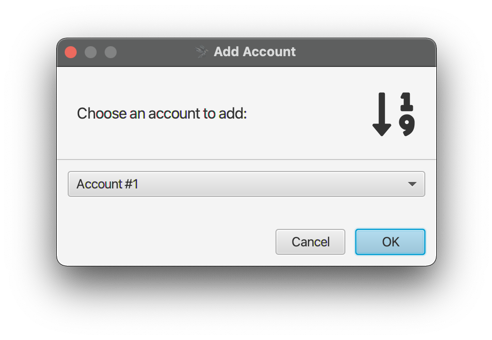
Sparrow will then add a row of tabs on the left. The wallet account you have recently configured will be labelled Deposit, and the new wallet account is Account #1.
With a connected hardware wallet there are no files to export - make sure your device is connected and unlocked, then click ‘Connected Hardware Wallet’ from the four buttons in Sparrow and scan for it again. Sparrow will retrieve the public key details for the new account directly from the device. You can then click Apply, and your second account is ready for use!