Connect to Bitcoin Core
Prerequistes
This guide explains how to connect Sparrow Wallet to your Bitcoin Core node. If you haven’t read the Quick Start guide yet, that’s a good place to learn how to install and get introduced to Sparrow.
Bitcoin Core setup
Local setup
Before you can connect to Bitcoin Core, you will need to make sure that it is configured correctly. If you are connecting to Bitcoin Core running on the same machine as Sparrow, this is relatively simple. There is only one gotcha - if you are running the Bitcoin-Qt graphical user interface (as opposed to the command line), you will need to add a setting to the Bitcoin Core config file. This file is usually located in a standard location:
| OS | Location |
|---|---|
| macOS | ~/Library/Application Support/Bitcoin |
| Windows | %AppData%/Bitcoin (Locate AppData) |
| Linux | ~/.bitcoin |
The config file is called bitcoin.conf. If it’s not there, you can create it in a text editor.
Make sure the following line is present near the top:
server=1
This should be all that is necessary for Bitcoin Core running on the same machine (localhost). Make sure you do not have disablewallet=1.
If you are using Bitcoin Core v25 or later, you can also add the block filter index for faster rescans:
blockfilterindex=1
Remote setup
If Bitcoin Core is running on a different machine, you will need to make sure that it binds to the IP address you will connect to it on.
For example, if it is running on 192.168.0.10, add the following lines to bitcoin.conf below the other settings:
rpcuser=bitcoin
rpcpassword=yourpassword

[main]
rpcbind=127.0.0.1
rpcbind=192.168.0.10
rpcallowip=127.0.0.1
rpcallowip=192.168.0.0/16
This will allow you to connect to Bitcoin Core from anywhere on your local network using the provided username and password.
If you are using testnet, be sure to replace [main] with [test] in the configuration above.
Pruned nodes
Running a pruned node is fine - this is a way of reducing the disk space required by your Bitcoin Core node.
If you are running out of space, you can add this setting to your configuration and Bitcoin Core will prune (delete) old blocks to keep under the limit you specify.
For example, you can add the following at the top of bitcoin.conf to reduce Bitcoin Core’s disk usage to 1000MB (1GB):
prune=1000
However there are two caveats:
- Firstly, you won’t be able to scan for transactions earlier than whatever the earliest retained (unpruned) block is. Already scanned transactions are fine, so if your wallet reflects them (or is new) you are good going forward.
- Secondly, if you want to reverse this, you will need to start your full blockchain sync from the beginning again.
Transaction Index
If you are not using a pruned node, and you have a little extra disk space, you can add the transaction index in Bitcoin Core.
This enables certain features in Sparrow that are normally only available with an Electrum server, like looking up the inputs on transactions.
To add the transaction index, add the following to the top of bitcoin.conf:
txindex=1
Restart and Sync
You can now restart Bitcoin Core to take advantage of the new configuration. If you are still busy syncing your node, it’s best to wait until this is done, as you won’t have a complete ledger yet so Sparrow won’t be able to find your transactions.
Sparrow Wallet setup
Once your node has synced, you are ready to connect Sparrow Wallet. Open the application Settings dialog and select the Server tab. You should see a screen similar to this:
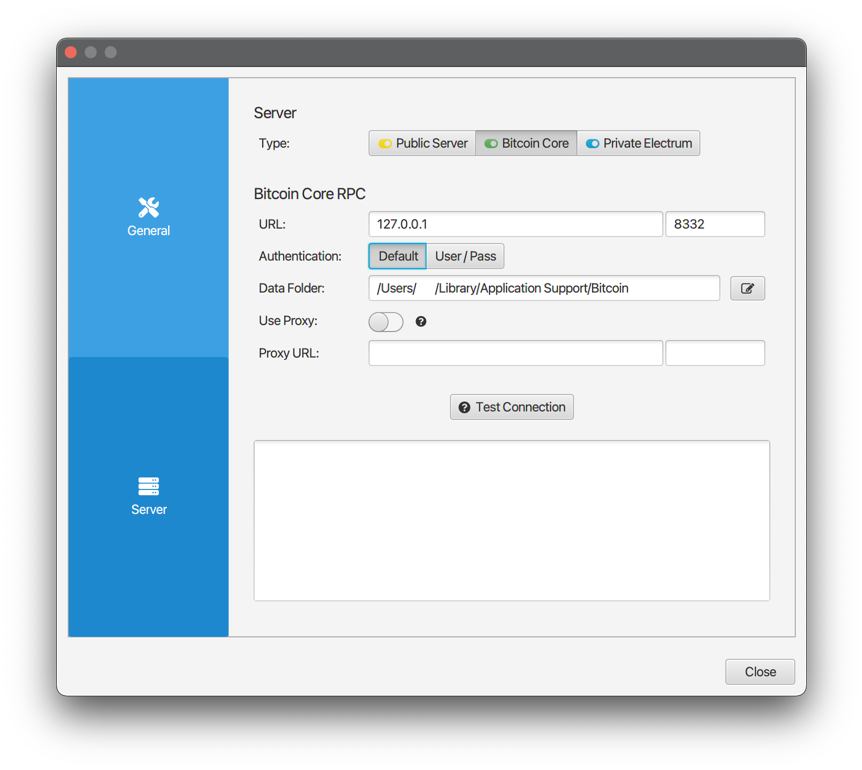
Local setup
The good news is that with a local setup and the default configuration, you should be ready to go! Sparrow will connect on localhost (127.0.0.1) using the default port, and authenticate by retrieving the cookie file that Bitcoin Core writes to the data folder every time it starts up. If you have changed the data folder for Bitcoin Core, be sure to select that folder now.
You can also configure a Tor proxy.
Sparrow won’t use the proxy to connect to Bitcoin Core unless you specify a .onion address in the URL.
But, it will use the proxy for all other external addresses, such as fetching exchange or fee rates.
Although connecting to Bitcoin Core over Tor is possible, it is fairly slow.
Consider using a private Electrum server instead if you need to connect over Tor.
Remote setup
If you are connecting to Bitcoin Core on another machine, make sure you have configured Bitcoin Core correctly as described above.
You will then need to configure the URL in Sparrow to match the IP address of the Bitcoin Core machine (the same IP you used in bitcoin.conf).
The default port should be fine.
Instead of authenticating via a cookie, you will need to select the User/Pass button and enter the username and password you configured in bitcoin.conf earlier.
Testing the Connection
Once you have configured Sparrow to match your Bitcoin Core setup, you’re ready to test the connection. Click Test Connection. Sparrow will attempt to connect to Bitcoin Core. If successful, you should see the following:
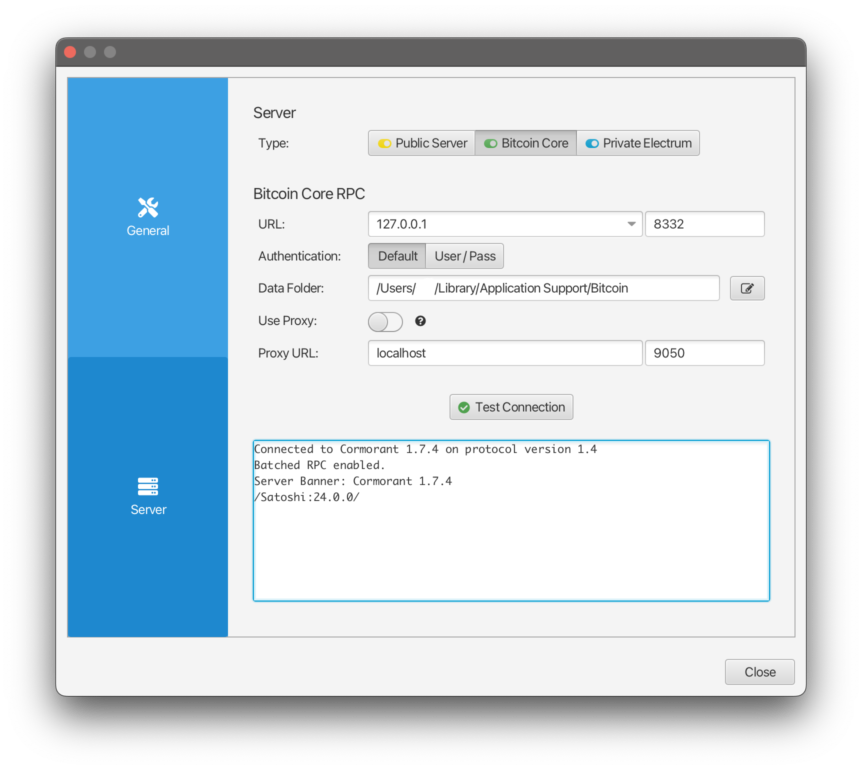
The details you see are provided by Cormorant, a library Sparrow uses to connect to Bitcoin Core.
If you see Connected to bwt instead, you are using an earlier version of Bitcoin Core (pre v24) which Sparrow connects to using the bwt library.
If Sparrow did not successfully connect, check your configuration settings. Make sure that you are running a recent version of Bitcoin Core, and that there are no firewalls preventing the connection.
Once you have successfully tested your server setup, you can close the Settings dialog. Sparrow will automatically connect to your node, and is now ready to import your wallet.
Creating your Wallet
You can now create a wallet in Sparrow. Select File > New Wallet in the menu.

Choose a name for the wallet (it must be unique). If you are creating a wallet with existing transactions, select the checkbox and choose an approximate date to start scanning from. Note you don’t need to be exact, so choose an earlier date if you are unsure. You can also change the date and rescan later if necessary.
Click Create Wallet.
You can now configure your wallet. Refer to the other guides for help in configuring different types of wallet. For example, you can create a wallet using seed words using the Quick Start guide.
Once you have configured your wallet, click Apply and choose a password to secure it. You can now click on the Transactions tab at the top. If this wallet has existing transactions, you should see a screen similar to the following:
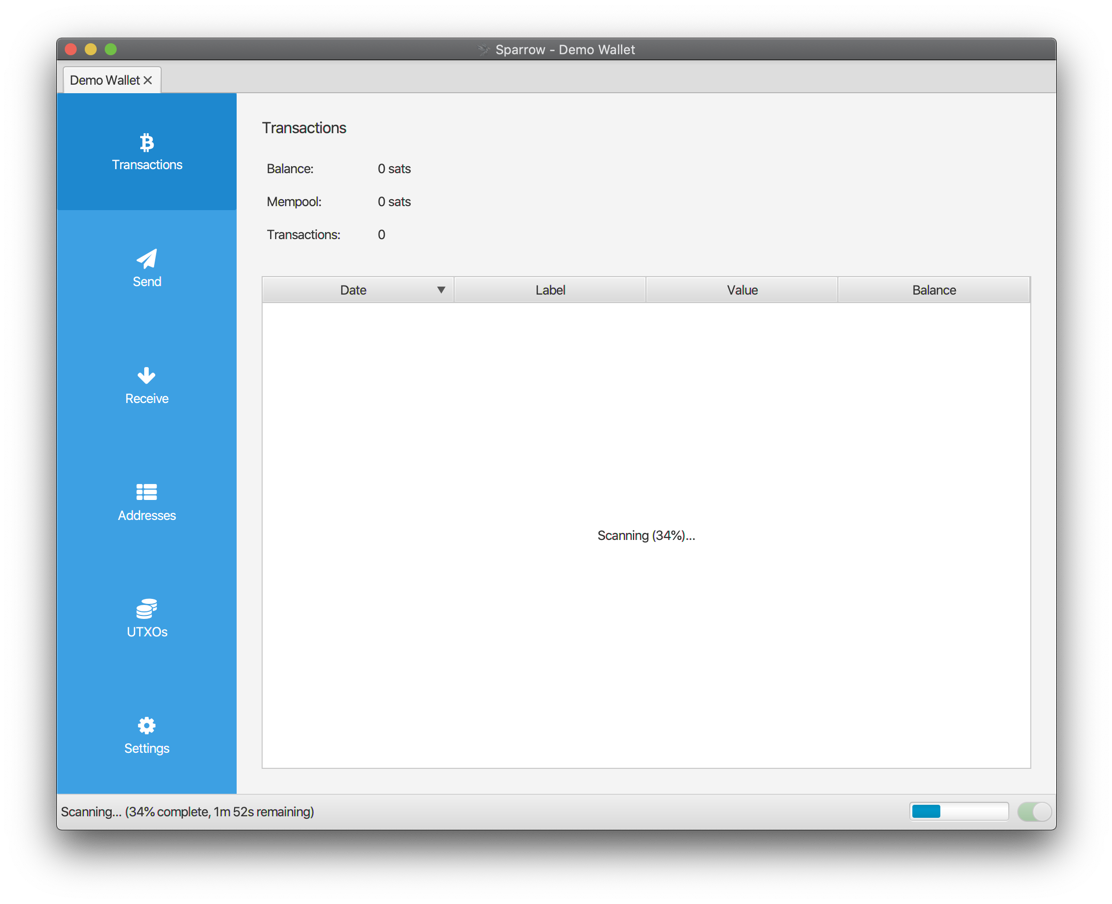
This indicates that Sparrow is requesting Bitcoin Core to scan for the existing transactions. Depending on the date specified earlier, and the hardware the node is running on, this process might take awhile to complete. The estimated time remaining is provided in the status bar.
Once completed, the existing transactions should appear in the table. If you don’t see any but expect to, you may have misconfigured your wallet, or set a scan start date that is not early enough.
You can change the start date and trigger a rescan using the Settings tab. Click on Settings, then Advanced and edit the date in the dialog that appears. Close the dialog and click Apply. Sparrow will clear the wallet history and rescan from Bitcoin Core from the date provided.
Congratulations!
You have successfully connected Sparrow to your Bitcoin Core node, and setup your wallet. You can now be confident that your wallet is private and you’re ready to send and receive bitcoin.